Java支持三种IO模式,分别是同步阻塞IO(BIO)、同步非阻塞IO(NIO)、多路复用IO(I/O multiplexing)以及异步IO(AIO)。本文第一章节将简单介绍这三种IO模式,后续章节将详细介绍同步非阻塞IO(NIO)以及多路复用IO。
(首页图是蔚来NIO图,侵权必删。= =! )
简介
同步阻塞IO
传统的IO是同步阻塞型IO(BIO)。阻塞型IO主要问题是会造成大量的系统资源浪费。例如我们通过Socket读取一个TCP连接的数据,当没有读取到数据时,read方法会阻塞当前线程。如下:
服务端socket读取数据将阻塞线程:
ServerSocket serverSocket = bind(listenIp, listenPort);
while (true) {
    // 阻塞等待数据到来
    Socket socket = serverSocket.accept();
    // 新建线程来处理该socket数据
    executorService.execute(() -> {
        BufferedReader br = new BufferedReader(new InputStreamReader(socket.getInputStream()));
        // 读取socket中的数据,如无数据将发生阻塞
        while (StringUtils.isNotBlank(str = br.readLine())){
            //doSomething
        }
    }
}
客户端读取数据同样会阻塞线程:
this.socket = new Socket(this.host, this.port);
this.is = socket.getInputStream();
// 阻塞读取
this.is.read();
如果服务端接受了大量客户端请求,很有可能使得大量的线程阻塞而占用大量机器资源,甚至使得服务器崩溃。
除此之外,传统IO是基于字节流的,用户只能顺序地从流中读取数据,且不能随意改变读取指针。
Java NIO
Java NIO是同步非阻塞型IO。NIO引入了Channel和Buffer这两个概念,用户可以从Channel中读取Buffer,也可以将Buffer写入Channel。
实现了AbstractSelectableChannel父类的Channel,可以通过configureBlocking方法可以将一个Channel设置为非阻塞模式,如下:
serverSocketChannel.configureBlocking(false);
Java 多路复用IO
我在这里将多路复用IO从上一小节剥离出来,是想让大家区分同步非阻塞型IO和多路复用IO的区别。
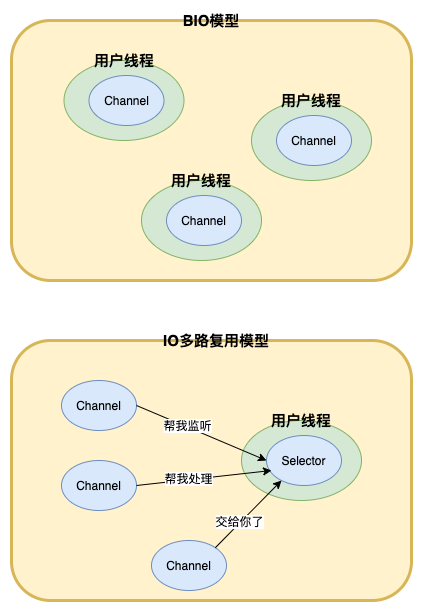
基于Java NIO的同步非阻塞IO,再结合Java NIO提供的Selector多路复用选择器,Java可以实现多路复用IO。NIO通过将Chanel注册进Selector中,由Selector来监听多个Channel的IO事件,从而避免单个Channel的读写阻塞导致整个线程挂起的情况。这样子,NIO就可以通过一个线程同时高效地管理多个Channel。
Selector的底层使用了底层系统调用,包括epoll、select等等,在主流的各个系统都有支持。但这部分内容不在本文的探讨范围之内。
Java AIO
AIO在Java中不常用,可以参考大咖写的 Java AIO编程
Buffer
Buffer在NIO中作为数据的载体,用户可以从Channel中读取Buffer,也可以将Buffer写入Channel。
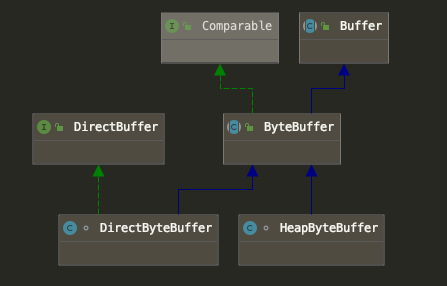
Buffer根据数据类型划分为ByteBuffer、ShortBuffer、CharBuffer、DoubleBuffer、FloatBuffer、IntBuffer等类型。这些Buffer都包含了两个子类实现,一个是DirectBuffer,另外一个是HeapBuffer。
其中以ByteBuffer类型为例,继承关系图如下所示:

Buffer使用
Buffer使用步骤非常简单:
- 初始化指定容量大小,并分配directBuffer或heapBuffer;
- 初始化后Buffer默认为写模式,用户可以向Buffer中写入数据;
- 用户写入完成后,调用flip()方法之后可以切换到读模式;
- Buffer处于读模式下,用户可以读取数据;
- 数据读取完毕后,用户可以调用clear()进行清理,或者调用compact()进行压缩。
使用样例如下:
public static void main(String[] args) {
    //ByteBuffer byteBuffer = ByteBuffer.allocateDirect(9); // direct buffer
    ByteBuffer byteBuffer = ByteBuffer.allocate(9);
    byteBuffer.put("hello".getBytes());
    byteBuffer.put(" ".getBytes());
    byteBuffer.put("NIO".getBytes());
    // 写模式切换到读模式
    byteBuffer.flip();

    byte[] content = new byte[9];
    byteBuffer.get(content);
    System.out.println(new String(content));
}
Buffer底层实现
Buffer抽象类里有四个关键字段,他们的大小关系为:mark <= position <= limit <= capacity,分别含义是:
- mark 调用mark()时候会缓存position的值,等待调用reset()时候恢复使用,默认值为-1;
- postition 当前的读指针或者写指针所在位置;
- limit 写模式下等于capacity,而读模式写对应的是写模式下的position;
- capacity 最大容量,与buffer所处的模式无关。
测试样例如下:
@Test
public void test() {
    IntBuffer intBuffer = IntBuffer.allocate(10);
    LOG.info("position={}, limit={}, capacity={}", intBuffer.position(), intBuffer.limit(), intBuffer.capacity());
    intBuffer.put(0);
    intBuffer.put(1);
    LOG.info("position={}, limit={}, capacity={}", intBuffer.position(), intBuffer.limit(), intBuffer.capacity());
    intBuffer.flip();
    LOG.info("position={}, limit={}, capacity={}", intBuffer.position(), intBuffer.limit(), intBuffer.capacity());
    intBuffer.get();
    LOG.info("position={}, limit={}, capacity={}", intBuffer.position(), intBuffer.limit(), intBuffer.capacity());
}
2020-05-15 16:32:20.934 [main] INFO  [IntBufferTest:18] - position=0, limit=10, capacity=10
2020-05-15 16:32:20.944 [main] INFO  [IntBufferTest:21] - position=2, limit=10, capacity=10
2020-05-15 16:32:20.944 [main] INFO  [IntBufferTest:23] - position=0, limit=2, capacity=10
2020-05-15 16:32:20.945 [main] INFO  [IntBufferTest:25] - position=1, limit=2, capacity=10
Buffer常用API
flip 写->读
flip方法可以将buffer从写模式切换到读模式。原理很简单,就是将limit置为当前position,且position置0。
public final Buffer flip() {
    limit = position;
    position = 0;
    mark = -1;
    return this;
}
clear 读,写 -> 读
clear方法不管buffer是读或写状态,都会清空buffer,重新恢复为初始写状态。但需要注意clear并没有清空原有数据,仅仅是修改了指针位置。依然可以读取到老的数据。
public final Buffer clear() {
    position = 0;
    limit = capacity;
    mark = -1;
    return this;
}
compact 读 -> 写
该方法是Buffer子类里的方法,用于在读模式下压缩空间,将还没读到的数据复制到缓存数组开头,也就是从[position, limit)复制到[0, limit-position)。注意compact仅限于读模式下调用,调用之后buffer切换为写模式。以HeapIntBuffer为例:
public IntBuffer compact() {
    // 复制[position, limit)到[0, limit-position)
    System.arraycopy(hb, ix(position()), hb, ix(0), remaining());
    // position置为limit-position,也就是写指针所在位置
    position(remaining());
    // 写模式下limit等于capacity
    limit(capacity());
    // 丢弃mark状态
    discardMark();
    return this;
}
rewind
很容易将clear和revind混淆,其实看看源码就知道区别:
public final Buffer rewind() {
    position = 0;
    mark = -1;
    return this;
}
由上可见,rewind没有修改limit,也就是没有切换buffer的读写模式,单纯是将position置为0。如果是读模式,相当于将读过的数据,重新从指针0开始再读一遍;如果是写模式,则是忽略已经写过的数据,从指针0位置重新开始写。
mark && reset
mark方法可以缓存当前的position指针,而reset方法则是将position恢复为之前mark所缓存的值。
注意上边提及的所有方法都可以丢弃mark缓存,也就是说mark && reset只有在读模式或者写模式写才能有效。例如:
@Test
public void testMark() {
    IntBuffer intBuffer = IntBuffer.allocate(10);
    intBuffer.put(0);
    intBuffer.put(1);
    LOG.info("buffer={}", intBuffer);
    intBuffer.mark();
    intBuffer.put(2);
    intBuffer.put(3);
    intBuffer.reset();
    LOG.info("buffer={}", intBuffer);
}
2020-05-15 18:04:23.873 [main] INFO  [IntBufferTest:60] - buffer=java.nio.HeapIntBuffer[pos=2 lim=10 cap=10]
2020-05-15 18:04:23.880 [main] INFO  [IntBufferTest:65] - buffer=java.nio.HeapIntBuffer[pos=2 lim=10 cap=10]
如图调用reset方法后,position重新恢复为mark所缓存的值。这时候继续写入数据的话,就会覆盖掉数值2和3。
Buffer的比较
以IntBuffer为例子,请见源码:
public int compareTo(IntBuffer that) {
    int n = this.position() + Math.min(this.remaining(), that.remaining());
    for (int i = this.position(), j = that.position(); i < n; i++, j++) {
        int cmp = compare(this.get(i), that.get(j));
        if (cmp != 0)
            return cmp;
    }
    return this.remaining() - that.remaining();
}
从源码可以看出两个buffer的比较其实只是对剩余未读的数据进行对比。换言之,只有处于读模式的buffer进行比较才会有意义。
Channel
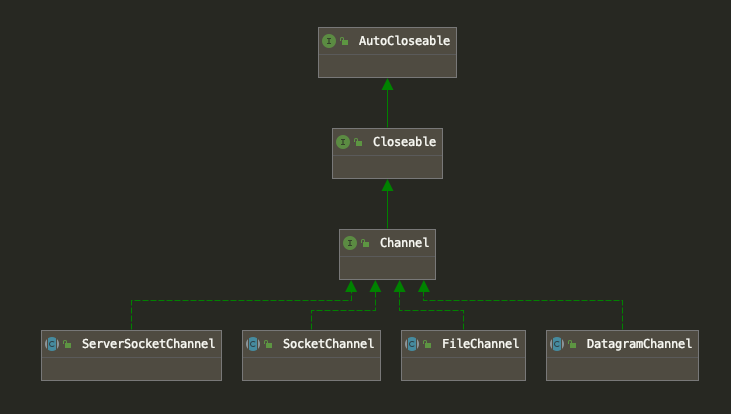
channel在NIO中作为数据流的通道。常用几个Channel子类包括:FileChannel、DatagramChannel、SocketChannel、ServerSocketChannel等。继承关系如下:

FileChannel
常用API:
- open(Path path, OpenOption… options) 打开文件,可以通过options指定文件的打开参数(读写模式等);
- read(ByteBuffer dst) 从channel中读取数据,并写入ByteBuffer中;
- write(ByteBuffer src) 读取ByteBuffer中的数据,并写入channel中;
- position(long newPosition) 设置channel的position;
- force(boolean metaData) 强制使得文件的所有变更落盘。metaData为true表示文件元数据变更也落盘,否则仅文件内容变更落盘;
- transferTo(long position, long count,WritableByteChannel target) 将该fileChannel内容写入目标channel中;
- truncate(long size) 将该channel截取为若干字节。
使用样例:
     @Test
    public void testInputFromFileChannel() {
        FileChannel fileChannel = null;
        try {
            fileChannel = FileChannel.open(new File("/Users/duval/input.txt").toPath(), StandardOpenOption.READ);
            ByteBuffer readBuffer = ByteBuffer.allocate(100);
            StringBuilder fileContent = new StringBuilder();
            while (fileChannel.read(readBuffer) != -1) {
                readBuffer.flip();
                fileContent.append(new String(readBuffer.array()));
                readBuffer.clear();
            }
            System.out.println(fileContent.toString());
        } catch (IOException e) {
            LOG.error("read failed", e);
        } finally {
            IOUtils.closeQuietly(fileChannel);
        }
    }

    @Test
    public void testOutputToFileChannel() {
        FileChannel fileChannel = null;
        try {
            fileChannel =  FileChannel.open(new File("/Users/duval/output.txt").toPath(), StandardOpenOption.WRITE, StandardOpenOption.CREATE);
            ByteBuffer writeBuffer = ByteBuffer.allocate(1000);
            writeBuffer.put("hello nio".getBytes());
            writeBuffer.flip();
            while (writeBuffer.hasRemaining()) {
                fileChannel.write(writeBuffer);
            }
            // 强制数据落盘
            fileChannel.force(true);
        } catch (IOException e) {
            LOG.error("write failed", e);
        } finally {
            IOUtils.closeQuietly(fileChannel);
        }
    }
DatagramChannel
DatagramChannel可以用来实现UDP通讯。常用的API如下:
- DatagramChannel open() 打开一个新的channel;
- DatagramChannel bind(SocketAddress local) 将该channel绑定到某个地址上(ip+端口);
- SocketAddress receive(java.nio.ByteBuffer dst) 接收数据;
- int send(java.nio.ByteBuffer src, java.net.SocketAddress target) 发送数据;
使用样例:
// UdpServer.java
/**
 * @author duval
 * @date 2020-05-17 20:17
 */
@Slf4j
public class UdpServer extends Thread {

    private DatagramChannel channel;

    public UdpServer() throws IOException {
        this.channel = DatagramChannel.open();
        this.channel.bind(new InetSocketAddress("localhost", 8080));
    }

    @Override
    public void run() {
        int num = 0;
        while (true) {
            SocketAddress address;
            ByteBuffer byteBuffer = ByteBuffer.allocate(15);
            try {
                address = channel.receive(byteBuffer);

                if (address != null && byteBuffer.hasRemaining()) {
                    byte[] array = new byte[byteBuffer.position()];
                    byteBuffer.flip();
                    byteBuffer.get(array);
                    byteBuffer.clear();
                    log.info("reveive:{}", new String(array));

                    response(address, num++);
                }
            } catch (IOException e) {
                log.error("receive failed", e);
            }
        }
    }

    private void response(SocketAddress address, int num) throws IOException {
        ByteBuffer content = ByteBuffer.allocate(15);
        content.put(("resp " + num).getBytes());
        content.flip();
        channel.send(content, address);
    }

    public static void main(String args[]) throws IOException, InterruptedException {
        UdpServer server = new UdpServer();
        server.start();
        server.join();
    }
}
// UdpClient.java
@Slf4j
public class UdpClient extends Thread {

    private DatagramChannel channel;

    public UdpClient() throws IOException {
        this.channel = DatagramChannel.open();
    }

    @Override
    public void run() {
        new Thread(new Runnable() {
            @Override
            public void run() {
                while (true) {
                    SocketAddress address;
                    ByteBuffer dataBuffer = ByteBuffer.allocate(15);
                    try {
                        address = channel.receive(dataBuffer);

                        if (address != null && dataBuffer.hasRemaining()) {
                            byte [] array = new byte[dataBuffer.position()];
                            dataBuffer.flip();
                            dataBuffer.get(array);
                            dataBuffer.clear();
                            log.info("reveive:{}", new String(array));
                        }
                    } catch (IOException e) {
                        log.error("receive failed", e);
                    }
                }
            }
        }).start();

        Scanner scanner = new Scanner(System.in);
        while (true) {
            String inputData =  scanner.nextLine();
            if (inputData.length() > 10) {
                log.error("too long");
                continue;
            }
            ByteBuffer dataBuffer = ByteBuffer.allocate(15);
            dataBuffer.put(inputData.getBytes());
            dataBuffer.flip();
            try {
                channel.send(dataBuffer, new InetSocketAddress("localhost", 8080));
            } catch (IOException e) {
                log.error("send failed", e);
            }
        }
    }

    public static void main(String args[]) throws IOException, InterruptedException {
        UdpClient client = new UdpClient();
        client.run();
        client.join();
    }
}
ServerSocketChannel
ServerSocketChannel用于TCP连接的服务器端。常用的API如下所示:
- 打开Channel、关闭Channel
ServerSocketChannel serverSocketChannel = ServerSocketChannel.open();
serverSocketChannel.close();
- 绑定监听地址端口
serverSocketChannel.socket().bind(new InetSocketAddress(8080));
- 等待客户度连接
SocketChannel clientChannel = serverSocketChannel.accept();
- 指定阻塞或非阻塞
serverSocketChannel.configureBlocking(false);
ServerSocketChannel初始化后默认是阻塞模式。比方说在阻塞模式下调用accept()方法后会阻塞进程等待直到有新的客户端连接到来,而在非阻塞模式下调用accept()方法不会发生阻塞而立即返回客户端socket(没有客户端连接时候返回null)。
- 将channel注册到selector中
serverSocketChannel.register(selector, SelectionKey.OP_ACCEPT);
Selector是NIO里核心组件,下一个章节将会详细介绍。当channel处于非阻塞模式,可以被注册到Selector中,由Selector代理接收所有的IO事件。
SocketChannel
与ServerSocketChannel对应,SocketChannel适用于TCP连接的客户端。常用API如下:
- 打开关闭Channel
SocketChannel sc = SocketChannel.open();
sc.close();
- 连接服务器
sc.connect(new InetSocketAddress("localhost", 8080));
- 指定阻塞或非阻塞
sc.configureBlocking(false);
- 注册到Selector
sc.register(selector, SelectionKey.OP_CONNECT);
- 读写数据
sc.write(writeBuffer);
sc.read(readBuffer);
Selector
Selector是NIO实现IO多路复用模型的重要组件。多个Channel可以被注册到同一个Selector上,然后Selector会不断的轮询注册在它上面的Channel。一旦某个Channel有了新的IO事件就会被筛选出来进一步处理。因此,只需要一个线程负责Selector的轮询,就能够支撑大量的连接,从而能够支撑高并发服务的开发。基于Selector实现的IO多路复用模型示意图如下:

KQueueSelectorImpl
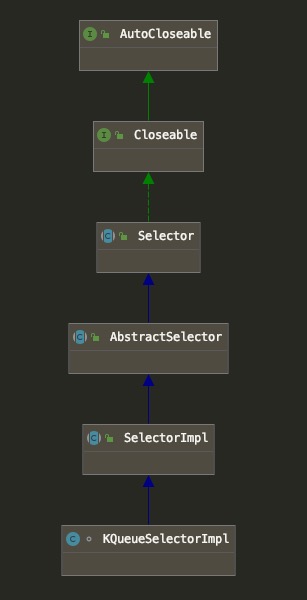
在MacOS下,Selector的默认实现是KQueueSelectorImpl,可以在JDK8源码下找到:openjdk-jdk8u-jdk8u/jdk/src/macosx/classes/sun/nio/ch/KQueueSelectorImpl.java
KQueueSelectorImpl继承关系如下:
而在Linux 2.6+内核下,Selector的默认实现是是EPollSelectorImpl,源码在中:openjdk-jdk8u-jdk8u/jdk/src/solaris/classes/sun/nio/ch/EPollSelectorImpl.java
我们从父类SelectorImpl里可以看到两个字段:
    // The set of keys with data ready for an operation
    protected Set<SelectionKey> selectedKeys;

    // The set of keys registered with this Selector
    protected HashSet<SelectionKey> keys;
selectedKeys保存的是有新IO事件等待处理的Key;而keys保存的是所有的被注册到该Selector的key。
SelectionKey
上文提到SelectionKey,这究竟为何物,我们一起来探讨下。先看看常用的API:
- public final Object attachment() 获取该SelectionKey的附加物。attachment常常用来附加数据。
- public abstract int interestOps() 获取感兴趣事件集合。Channel在注册时候可以指定感兴趣的事件。这里返回int,因为用位来表示事件。
- public abstract int readyOps() 获取已经就绪的事件集合。这里返回int,因为用位来表示事件。
- public abstract SelectableChannel channel() 返回该key关联的channel实例。
- public abstract Selector selector() 返回该key关联的Selector
- public final boolean isAcceptable() 检查OP_ACCEPT事件是否就绪。如果就绪,表示有新的stocket连接。
- public final boolean isConnectable() 检查OP_CONNECT事件是否就绪。如果就绪,表示可以发起连接到服务器。
- public final boolean isReadable() 检查OP_READ事件是否就绪,如果就绪则表示可以开始读取socket中的数据。
- public final boolean isWritable() 检查OP_WRITE事件是否就绪,如果就绪,表示可以写数据到Channel中。
从上可以看到,SelectionKey其实是将channel实例和Selector关联起来,并且包含了就绪事件集合以及附加物的一个数据结构。
将Channel注册到Selector
实现了SelectableChannel的实例可以调用register方法进行注册。
SelectionKey selectionKey = socketChannel.register(selector, SelectionKey.OP_WRITE);
从register调试,就到了AbstractSelectableChannel的register方法:
public final SelectionKey register(Selector sel, int ops,
                                       Object att)
        throws ClosedChannelException
    {
        synchronized (regLock) {
            if (!isOpen())
                throw new ClosedChannelException();
            if ((ops & ~validOps()) != 0)
                throw new IllegalArgumentException();
            // 如果是阻塞型Channel,则抛异常终止。
            // 所以需要调用configureBlocking(false),标记为非阻塞Channel
            if (blocking)
                throw new IllegalBlockingModeException();
            // 从缓存中加锁获取与该Selector对应的SelectionKey
            SelectionKey k = findKey(sel);
            if (k != null) {
                // 将入参指定的事件ops记录到interestOps中去。
                k.interestOps(ops);
                // 更新附加物,这里默认为null
                k.attach(att);
            }
            // 如果SelectionKey不存在,则调用Selector的register方法来注册。
            if (k == null) {
                // New registration
                synchronized (keyLock) {
                    if (!isOpen())
                        throw new ClosedChannelException();
                    k = ((AbstractSelector)sel).register(this, ops, att);
                    addKey(k);
                }
            }
            return k;
        }
    }
注册步骤总结:
- 实现了SelectableChannel的实例调用register方法,入参需要指定Selector和注册事件,也可以指定附加物;
- 在SelectableChannel的register方法中,先加锁去缓存中找有没有Selector对应的SelectionKey
- 2.1 如果有,就直接通过缓存的key来更新注册时间以及附加物。(因为这两个字段都是volatile,能确保可见性)。
- 2.2 如果没有,则通过Selector的register方法来注册事件,并返回新建的key。
Selector使用样例
Sever端
public class NioEchoServer {
    private ByteBuffer writeBuffer = ByteBuffer.allocate(1024);
    private ByteBuffer readBuffer = ByteBuffer.allocate(1024);

    private static final int BUF_SIZE = 256;
    private static final int TIMEOUT = 10000;

    public void start() throws Exception {
        // 打开服务端 Socket
        ServerSocketChannel serverSocketChannel = ServerSocketChannel.open();

        // 打开 Selector
        Selector selector = Selector.open();

        // 服务端 Socket 监听8080端口, 并配置为非阻塞模式
        serverSocketChannel.socket().bind(new InetSocketAddress(8080));
        serverSocketChannel.configureBlocking(false);

        // 将 channel 注册到 selector 中.
        // 通常我们都是先注册一个 OP_ACCEPT 事件, 然后在 OP_ACCEPT 到来时, 再将这个 Channel 的 OP_READ
        // 注册到 Selector 中.
        serverSocketChannel.register(selector, SelectionKey.OP_ACCEPT);

        Scanner scanner = new Scanner(System.in);


        while (true) {
            // 通过调用 select 方法, 阻塞地等待 channel I/O 可操作
            if (selector.select(TIMEOUT) == 0) {
                System.out.println(".");
                continue;
            }

            // 获取 I/O 操作就绪的 SelectionKey, 通过 SelectionKey 可以知道哪些 Channel 的哪类 I/O 操作已经就绪.
            Iterator<SelectionKey> keyIterator = selector.selectedKeys().iterator();

            while (keyIterator.hasNext()) {

                SelectionKey key = keyIterator.next();

                // 当获取一个 SelectionKey 后, 就要将它删除, 表示我们已经对这个 IO 事件进行了处理.
                keyIterator.remove();

                if (key.isAcceptable()) {
                    System.out.println("new client connected...");
                    // 当 OP_ACCEPT 事件到来时, 我们就有从 ServerSocketChannel 中获取一个 SocketChannel,
                    // 代表客户端的连接
                    // 注意, 在 OP_ACCEPT 事件中, 从 key.channel() 返回的 Channel 是 ServerSocketChannel.
                    // 而在 OP_WRITE 和 OP_READ 中, 从 key.channel() 返回的是 SocketChannel.
                    SocketChannel clientChannel = ((ServerSocketChannel) key.channel()).accept();
                    clientChannel.configureBlocking(false);
                    //在 OP_ACCEPT 到来时, 再将这个 Channel 的 OP_READ 注册到 Selector 中.
                    // 注意, 这里我们如果没有设置 OP_READ 的话, 即 interest set 仍然是 OP_CONNECT 的话, 那么 select 方法会一直直接返回.
                    clientChannel.register(key.selector(), OP_READ, ByteBuffer.allocate(BUF_SIZE));
                }

                if (key.isReadable()) {
                    SocketChannel clientChannel = (SocketChannel) key.channel();
                    readBuffer = (ByteBuffer) key.attachment();
                    int bytesRead = clientChannel.read(readBuffer);
                    if (bytesRead == -1) {
                        clientChannel.close();
                    } else if (bytesRead > 0) {
                        key.interestOps(OP_READ | SelectionKey.OP_WRITE);
                        System.out.println("receive:" + new String(readBuffer.array(), 0, bytesRead));
                    }
                }

                if (key.isValid() && key.isWritable()) {
                    System.out.print("send:");
                    String input = scanner.nextLine();

                    writeBuffer.clear();
                    writeBuffer.put(input.getBytes());
                    //将缓冲区各标志复位,因为向里面put了数据标志被改变要想从中读取数据发向服务器,就要复位
                    writeBuffer.flip();
                    SocketChannel clientChannel = (SocketChannel) key.channel();
                    clientChannel.write(writeBuffer);

                    if (!writeBuffer.hasRemaining()) {
                        key.interestOps(OP_READ);
                    }
                    writeBuffer.compact();
                }
            }
        }
    }

    public static void main(String args[]) throws Exception {
        new NioEchoServer().start();
    }
}
Client端
public class NioEchoClient {

    private static ByteBuffer writeBuffer = ByteBuffer.allocate(1024);
    private static ByteBuffer readBuffer = ByteBuffer.allocate(1024);

    private static final int TIMEOUT = 10000;

    public static void main(String[] args) throws IOException {
        // 打开socket通道
        SocketChannel sc = SocketChannel.open();
        // 设置为非阻塞
        sc.configureBlocking(false);
        // 连接服务器
        sc.connect(new InetSocketAddress("localhost", 8080));
        // 打开选择器
        Selector selector = Selector.open();
        // 注册连接服务器
        sc.register(selector, SelectionKey.OP_CONNECT);

        Scanner scanner = new Scanner(System.in);

        while (true) {
            while (selector.select(TIMEOUT) == 0) {
                System.out.println(".");
                continue;
            }

            //返回此选择器的已选择键集。
            Set<SelectionKey> keys = selector.selectedKeys();
            Iterator<SelectionKey> keyIterator = keys.iterator();
            while (keyIterator.hasNext()) {
                SelectionKey key = keyIterator.next();
                keyIterator.remove();
                // 判断此通道上是否正在进行连接操作。
                if (key.isConnectable()) {
                    sc.finishConnect();
                    sc.register(selector, SelectionKey.OP_WRITE);
                    System.out.println("server connected...");
                    break;
                } else if (key.isWritable()) {
                    System.out.print("send:");
                    String message = scanner.nextLine();

                    writeBuffer.clear();
                    writeBuffer.put(message.getBytes());
                    //将缓冲区各标志复位,因为向里面put了数据标志被改变要想从中读取数据发向服务器,就要复位
                    writeBuffer.flip();
                    sc.write(writeBuffer);

                    //注册写操作,每个chanel只能注册一个操作,最后注册的一个生效
                    //如果你对不止一种事件感兴趣,那么可以用“位或”操作符将常量连接起来
                    //int interestSet = SelectionKey.OP_READ | SelectionKey.OP_WRITE;
                    //使用interest集合
                    sc.register(selector, SelectionKey.OP_READ);
                    sc.register(selector, SelectionKey.OP_WRITE);
                    sc.register(selector, SelectionKey.OP_READ);

                } else if (key.isReadable()) {
                    SocketChannel client = (SocketChannel) key.channel();
                    //将缓冲区清空以备下次读取
                    readBuffer.clear();
                    int num = client.read(readBuffer);
                    System.out.println("receive:" + new String(readBuffer.array(), 0, num));
                    //注册读操作,下一次读取
                    sc.register(selector, SelectionKey.OP_WRITE);
                }
            }
        }

    }
}
- 参考资料
- Java NIO Tutorial 很好的NIO教程,比国内的大部分资料都齐全。
- 10分钟看懂, Java NIO 底层原理 将Java四大IO模型讲得通俗易懂透彻的文章。
转载请注明来源,欢迎对文章中的引用来源进行考证,欢迎指出任何有错误或不够清晰的表达。可以在下面评论区评论,也可以邮件至 duval1024@gmail.com

